Introduction
Cloud monitoring is a very interesting application the Connectino can be used for. Nearly all sensors, shields and accessories you can find for the Arduino can be used on the Connectino too.
In this tutorial you will learn the basics on how to connect your Connectino to use with the Microsoft Azure Cloud Services.
Concept
To communicate with Azure, the device uses a cloud gateway called IoT Hub. To access the hub your device is assigned to it’s device identity, registered to the IoT Hub. All your devices can be managed from one hub. In this tutorial we save data in the device twin, a JSON-String assigned to your device Identity that you can access from your device and the cloud, managing your device’s status.
There are multiple ways of accessing the hub. Here we will show you the most secure way using CA signed certificates. You can create your own Root CA, using openssl(Linux) or the PowerShell-Script provided by Microsoft.
Requirements
To be able to run through this tutorial, you will need:
- A Connectino and some data you want to send into the cloud (here we will use the on-board distance sensor)
- The correctly set up Arduino IDE as described in our Initial Setup tutorial.
- A Microsoft Account (you probably got one, if you use Windows) and register with Microsoft Azure.
- A RootCA to upload on the Azure Server and at least a Client Certificate to save on the Connectino.
Create and upload your certificates
Create your Root CA and Client Certificate as described in the Microsoft instructions. Next use our firmware creation tool (coming soon) to get a firmware file containing your Client Certificate and private key file.
Now open your web browser and connect to the Connectino. If you are not logged in, click on the Login-Icon and log in. Then click on the Firmware Update Icon, select the previously generated *.fwu file and click Update.
Configure your Azure Cloud
Microsoft provides countless documentations so we will just tell you what you need to use the Azure cloud:
To connect the Connectino you will now need:
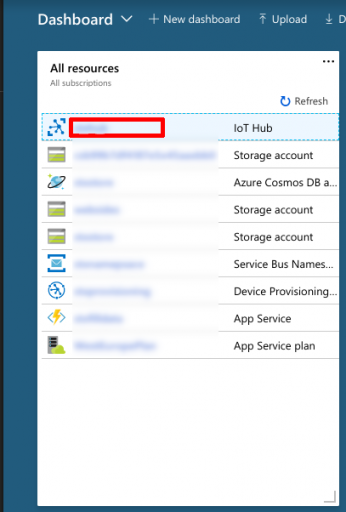
- Your IoT Hub ID (the name of the IoT Hub as shown on your Dashboard
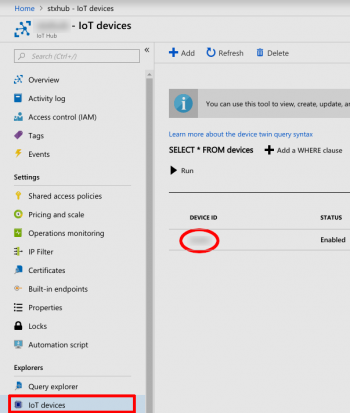
- Your Device ID (the name of the Device as shown on “Your IoT Hub”/”IoT Devices”
That and the Certificate on your Connectino should be enough to setup the connection.
Setup the Connectino
The following code will update your device twin, read the update return message and get a notification, if the twin was changed from somewhere else. To make it work you have to change the #devines HUB_ID and DEVICE_ID.
Download Example: ConnectinoAzureBasic.ino
#include <ConnectinoMqtt.h>
#include <Adafruit_VL6180X.h>
#include <SoftwareSerial.h>

#define HUB_ID "YOUR HUB ID"
#define DEVICE_ID "YOUR DEVICE ID"

#define TWIN_PUB "$iothub/twin/PATCH/properties/reported/?$rid=%u"
#define TWIN_DES "$iothub/twin/PATCH/properties/desired/#"
#define TWIN_SUB "$iothub/twin/res/#"

#define SEND_THR 5000 // don't send messages less than 5s apart

uint8_t val = 0;                 // variable to store the sensor-value
uint8_t sendVal = 0;             // last sent Value
char ioBuffer[128];           // variable to store the MQTT-string in
char topBuffer[64];           // variable to store the Topic-string in
uint16_t ioBufferSize = 128;
uint16_t topBufferSize = 64;
uint32_t lastSend = 0;
uint16_t rid = 0;

ConnectinoMqtt mqtt = ConnectinoMqtt(StxSerial); // Create Mqtt-instance
Adafruit_VL6180X sensor = Adafruit_VL6180X();
SoftwareSerial debug = SoftwareSerial(8,9);

void setup()
{
	// Initiate sensor
	sensor.begin();
	debug.begin(9600);

	// Initiate Connectino Serial
	StxSerial.begin();
	StxSerial.add(mqtt);

	mqtt.setState(0); // turn off mqtt
	mqtt.setSessionConfiguration( // set MQTT Configuration
		HUB_ID".azure-devices.net", // serveradress
		8883, // port
		"", // resource
		DEVICE_ID, // clientId / deviceId
		HUB_ID".azure-devices.net/"DEVICE_ID"/api-version=2016-11-14", //username
		"" // authentication token
		);

	mqtt.setState(1); // turn on mqtt

	for(int i = 0; !mqtt.isConnected(); i++) delay(2000); // wait for connection

	mqtt.subscribe(TWIN_SUB); // Topic to get publish responses
	mqtt.subscribe(TWIN_DES); // Topic to get twin-desired updates
}

void loop()
{
	val = sensor.readRange();

	if(sendVal != val && SEND_THR < (millis() - lastSend) )
  { // if sensorvalue differs from last sent value
		sprintf(ioBuffer, "{\"dist\":\"%u\"}", val); // create json-msg
		sprintf(topBuffer, TWIN_PUB, rid++); // create topicname

		// publish the JSON on the mqtt-topic
		mqtt.publish(topBuffer, ioBuffer, 1, 1);
		sendVal = val;
		lastSend = millis();
	}

	if(mqtt.isDataAvailable()){
    // if data on topic was received write them into buffers
		mqtt.getData(ioBuffer, ioBufferSize ,topBuffer, topBufferSize);
    // and print them
		debug.println(topBuffer);
		debug.println(ioBuffer);

    ioBufferSize = sizeof(ioBuffer); // reset size to 100% for next reading
	}
}
Be aware that for big messages you probably have to change the buffer and buffer sizes for the mqtt-string. But keep an eye on the ATmega’s RAM and don’t overdo it. Sometimes it can take up to 5 Minutes to connect to the Server.
Checking the functionality
Well, now you probably want to check if everything worked out. We have two functions to test: publishing data into the twin and getting data if the twin was changed remotely. First for the publishing: If you change the sensors value by hovering your hand over it, your Connectino should print on it’s debug PINs the server’s answer topic (something like $iothub/twin/res/204/?$rid=2, where 204 is the return code.). Is the return code not 20X something went wrong.
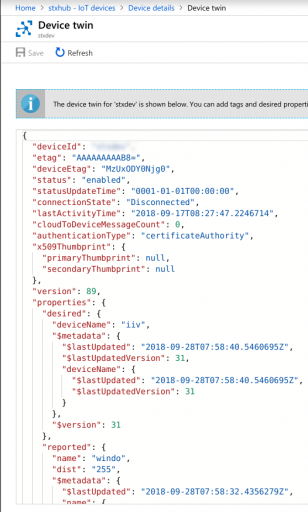
To see the publish in the cloud log in to your Azure Portal, navigate to your IoT Hub and Device Identity, click on Device twin and after every send you click on Refresh the reported state should change.
To test the change-notification just change something in the desired chunk of the Device twin in the azure portal and click save. Over your Connectino’s debug PINs you should now be able to read the changes.