Introduction
To get all the benefits of managing your Connectino controlled application from within the cloud, you will need to connect to a cloud service. One of such available is IBM Watson’s IoT Platform.
This tutorial will show you how you can setup the connection to IBM Watson and how to send your sensors data into the cloud with your Connectino.
Requirements
- To setup the Arduino IDE for Connectino please use our Quick-Start-Guide available at: Initial setup
- You will need to create a free account on IBM Bluemix Console
- Create a device on the IBM platform as described in Step 1 at: Create a device
- You will need the organization id, device id, device authentication token and device type
This tutorial was verified to work with the following software versions of the Arduino library and WiFi module firmware:
- Arduino Library: 1.0
- Wifi module firmware: 1.0 and 1.1
Code
Setup Function
At the start your sketch needs to initialize the necessary sensors and the MQTT module. To start the MQTT connection to the IBM-cloud-server you set the state of the MQTT module to off, then configure and restart it and wait for the connection.
In the configuration you will insert the information you got during the device registration process.
If the connection can not be established, check your Ids. When you used your Connectino for some other MQTT communication, you probably need to change the configuration on your board or simply perform a factory reset.
Loop Function
For the loop you just need to check your sensors, build a message in the right JSON-format IBM requires and publish your information.
Sourcecode
#include <ConnectinoMqtt.h>
#include <Adafruit_VL6180X.h>

#define ORG_ID "YOUR_ORGID"
#define DEVICE_TYPE "YOUR_DEVICE_TYPE"
#define DEVICE_ID "YOUR_DEVICE_ID/NAME"
#define TOKEN "YOUR_AUTH_TOKEN"

#define TOP_PUB "iot-2/evt/status/fmt/json"

uint8_t val = 0;                 // variable to store the sensor-value
uint8_t sendVal = 0;             // last sended Value
char sendMsg[127];           // variable to store the MQTT-string in

ConnectinoMqtt mqtt = ConnectinoMqtt(StxSerial); // Create Mqtt-instance
Adafruit_VL6180X sensor = Adafruit_VL6180X();

void setup()
{
	// Initiate sensor
	sensor.begin();

	// Initiate Connectino Serial
	StxSerial.begin();
	StxSerial.add(mqtt);
	mqtt.setState(0); // turn off mqtt

	mqtt.setSessionConfiguration( // set MQTT Configuration
		ORG_ID".messaging.internetofthings.ibmcloud.com", // serveradress
		8883, // port
		"", // resource (stays empty for IBM)
		"d:"ORG_ID":"DEVICE_TYPE":"DEVICE_ID", // clientId / deviceId
		"use-token-auth", // username
		TOKEN // authentication token
		);
	mqtt.setState(1); // turn on mqtt

	while(!mqtt.isConnected())
		delay(500); // wait for connection
}

void loop()
{
	delay(1000);
	val = sensor.readRange();

	if(sendVal != val) // if sensorvalue differs from last sent value
	{
		// build mqtt-JSON - for IBM the structure of {d:{...}} is necessary
		sprintf(sendMsg, "{\"d\":{\"range\":%u}}", val);
		// publish the JSON on the mqtt-topic
		if(mqtt.publish(TOP_PUB,sendMsg))
			sendVal = val;
	}
}
Conclusion
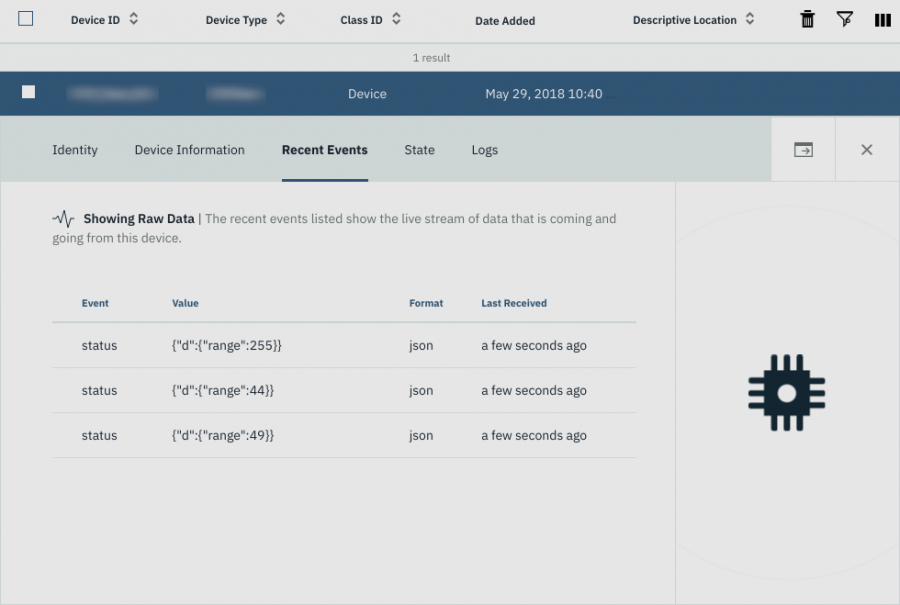
To see what your device sends to your server go to:
- IBM Cloud IoT and login with your IBM credentials.
- Then select your orgID on the top right.
- When the menu on the left shows up, hover it with your cursor and choose Devices.
- Select your device and click on the Recent Events -tab.
- There should every message be shown the IBM cloud received from your device.