Introduction
Arrow Connect can be used to display Informations from your cloud-device in the online-portal. Connectino can be set up to be monitored with this service, so you can see what your Connectino is doing from everywhere and get detailed and graphically organized informations about its state.
Requirements
To setup the Arduino IDE for Connectino please use our Quick-Start-Guide available at: Initial Setup
This tutorial was verified to work with the following software versions of the Arduino library and WiFi module firmware:
- Arduino Library: 1.0
- Wifi module firmware: 1.0 and 1.1
Arrow Connect
There is an arrow connect application running on your Connectino, the application will send sensor data to the arrow connect portal. You just need to configure the parameters and activate the arrow connect application.
Configure Arrow Connect
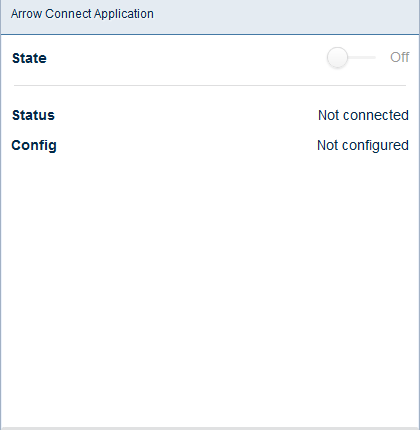
Open the arrow connect module on the website. In the window that just opened you have two views, one for the status and one for the configuration. You can switch between these views by selecting the buttons on the bottom of this window.
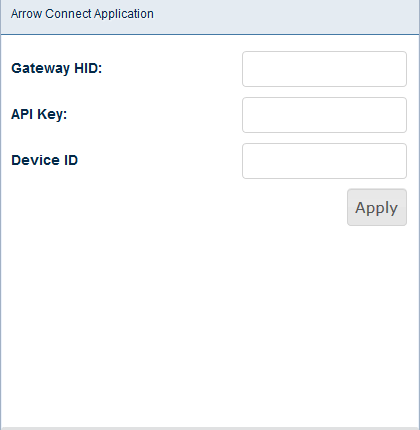
Switch to the configuration view and enter the parameters Gateway HID, API Key and Device ID on the configuration page. You accept the configuration with the ”Apply” button.
After the configuration switch back to the status window and activate Arrow Connect by switching the state slider to “On”. After Arrow Connect has been started, you should see the Status change to “Connected”. If it doesn’t, check the WLAN configuration of your Connectino.
You can also configure your ArrowConnect connection with the provided library.
Arrow Connect Portal
To access the Arrow Connect Portal you need an account for the login.
Use your login credentials on Arrow Portal to access the data of the sensors on the connectino.
Add a Gateway
First you need to create a gateway. From the bar at the top select “ASSETS/Gateways” and use the button “+ Add” to create a gateway. Choose a UID and Name, select as Type “Cloud”, as Device Type “default-gateway”, choose an OS Name, a Software Name and a Software Version, leave the rest at their defaults and push the Save button.
Select the gateway and take a note of the gateway HID. You can read it out by selecting the button “show hid >” at the top below the gateway’s name.

You also need the API key of this gateway. Therefore select “Access Keys” on the left, select the API Key and take a note of the “Raw Api Key”
Add a Device
Now that we have a gateway we can add a device, this will be the shadow device where the data of the Connectino is sent to.
The device needs a type to be selected, so we need to create this beforehand. Go to “CONFIGURATION/Asset Types” and use the button “+ Add” to create the Asset Type. Insert a name and description and select “DEVICE” as Asset Category.
Now that we have an Asset Type select “ASSETS/Devices” and use the button “+ Add” to create a device. Select a name and UID, select the previously created Gateway and Asset Type and create the device by using the Save button at the bottom.
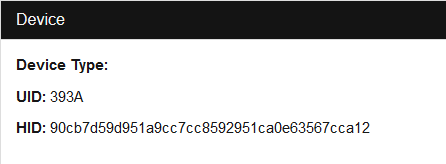
Now you need to take a note of the device HID, you find it by selecting the created device and selecton the left menu. You can now see the device HID.
![]()
Telemetry
After setting up the gateway and device you need to configure the Arrow Connect Module of the Connectino with the noted parameters Gateway HID, Gateway API Key and Device HID.
After setting up the Connectino it will start sending data to the Arrow Connect Server. It will send the brightness and the distance every ten seconds. The distance is only sent if the sensor (yellow circle in the bottom picture) recognizes an object in the way. You can try to hold your hand in the vicinity of the sensor for a measurement to be taken.

You can view the data by checking out the Telemetry window of your device.
![]()
Code
Setup Function
As the Arrow Connect configuration has to be done per Web-GUI as discribed above you don’t have to setup something beside the module and your sensors.
Loop Function
To publish information to your Arrow Connect Portal, use the ArrowConnect.publish(var, value,..); method, as shown in the minimal example. Mind that you need to be connected to an Arrow Connect Server. For a more detailed code-example klick the download below.
Sourcecode
#include "Adafruit_VL6180X.h"
#include <ConnectinoArrowConnect.h>

ConnectinoArrowConnect ArrowConnect(StxSerial);
Adafruit_VL6180X sensor = Adafruit_VL6180X();

void setup() {
  sensor.begin();

	/* initialize ArrowConnect Serial */
  StxSerial.begin();
  StxSerial.add(ArrowConnect);
}

void loop() {

	/* publish brightness data */
	int32_t lux = (int32_t)sensor.readLux(VL6180X_ALS_GAIN_5);
	int32_t range = (int32_t)sensor.readRange();

	ArrowConnect.publish("lux", lux, "range", range);
	delay(5000);
}
Conclusion
Now you should be able to connect your Connectino to the Arrow Connect service and publish information on it. That way you are able to display and monitor all the data your Connectino collects with its sensors and modules, from everywhere you want.
TUTORIALS